How to Start a Blog with Bluehost (2026) – Step-by-Step Beginner Guide
Want to start your own blog but don’t know where to begin?
Maybe you want to share your ideas, build an online business, or create a side hustle that could earn money in the future.
But here’s the problem: you have never created a website before.
You might be wondering:
- Do I need coding skills to start a blog?
- Is WordPress difficult for beginners?
- How much does it cost to create a blog?
- Can I really set everything up by myself?
The good news is that you don’t need to be a web designer or a technology expert.
In this beginner-friendly guide, I’ll show you how to start a blog with Bluehost in 2026, step by step, even if you’ve never built a website before.
I used Bluehost for about three years, and it was the first web hosting service I ever tried.
I remember how confusing everything seemed when I was just getting started. But once I began setting up WordPress, I realised the process was easier than I expected.
In this guide, I’ll explain the basics, walk you through the Bluehost blog setup process, and help you get ready to publish your first blog post.
You can follow along at your own pace.
Quick Answer: How Do You Start a Blog with Bluehost?
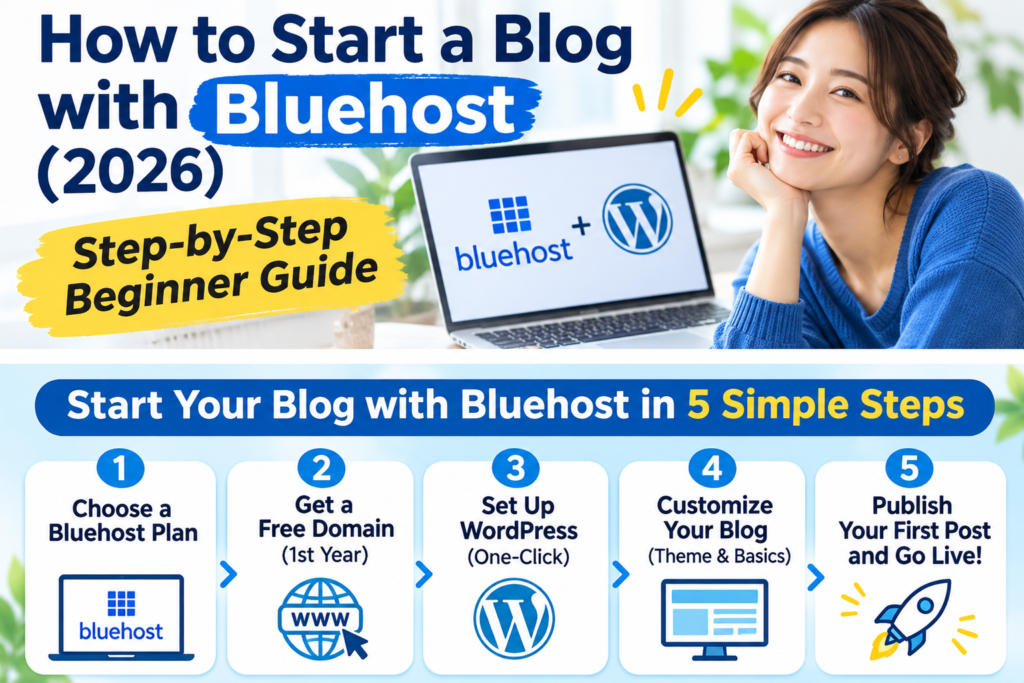
To start a blog with Bluehost, you need a domain name, a hosting plan, and WordPress.
Here is a simple overview of the process:
- Choose your blog topic. Decide what you want to write about.
- Visit Bluehost. Choose a hosting plan that fits your budget.
- Choose your domain name. Pick the web address for your blog.
- Create your Bluehost account. Review your order and complete sign-up.
- Install WordPress. Use Bluehost’s WordPress setup tools.
- Choose a WordPress theme. Customise how your blog looks.
- Create your important pages. Set up pages such as About and Contact.
- Write and publish your first blog post. Your blogging journey begins!
That’s the basic process.
You don’t need to learn HTML, CSS, or other programming languages to complete these steps.
Bluehost provides tools that make WordPress installation easier for beginners.
And don’t worry if some of these words sound unfamiliar. I’ll explain them as we go.
Why I Chose Bluehost for My First Blog
When I started blogging, I had no experience setting up a WordPress website.
I didn’t know much about web hosting, domain names, or how WordPress worked.
I wanted something simple because I was worried about making mistakes.
That’s why I chose Bluehost.
My Experience Using Bluehost for About Three Years
Bluehost was my first web hosting provider, and I used it for approximately three years.
One thing I appreciated was how easy it was to get started with WordPress.
I didn’t need to write code or understand complicated technical settings.
The setup process was straightforward enough that I could begin building my blog without feeling completely lost.
The first year was also relatively affordable, which mattered because I was starting.
Of course, hosting costs can increase after the introductory period, so it’s important to check renewal prices before purchasing a plan.
What Happened When My Website Had a Malware Problem?
My experience with Bluehost wasn’t perfect.
At one point, my WordPress website got infected with malware.
I was worried because I didn’t know how to fix it myself.
I contacted Bluehost through live chat support and explained what had happened.
The support team helped me understand the problem and the cleanup process.
The malware cleanup required an additional payment, but after the cleanup, my WordPress website was restored quickly.
That experience taught me something important:
When you’re a beginner, having access to technical support can make a big difference.
It also taught me that website security, regular updates, and backups are important, even when your hosting provider offers security features.
Would I Recommend Bluehost to Beginners?
Based on my experience, I think Bluehost is worth considering if you’re starting your first WordPress blog.
Here are the main reasons:
- The WordPress setup process was easy for me to follow.
- I could start without coding knowledge.
- Live chat support helped when I experienced a technical problem.
- The initial hosting cost fit my budget.
- I could focus on learning how to blog instead of building a website from scratch.
However, Bluehost isn’t the only hosting option, and it may not be the best choice for everyone.
Compare the total cost, renewal rates, included features, and support options before deciding.
What Is Bluehost, and Why Do You Need It?
Before starting your blog, let’s explain two important things: web hosting and WordPress.
What Is Web Hosting?
Think of your blog as a house.
Your domain name is the address people use to find it.
Your web hosting is the space where your website’s files and information are stored.
Without web hosting, a self-hosted WordPress blog won’t have a server to run on.
Bluehost is a web hosting company that provides the server resources and tools needed to run a website.
It offers hosting options designed for WordPress users, including beginners.
What Is WordPress?
WordPress is software that helps you create and manage your website.
You can use it to:
- Write and publish blog posts.
- Add images and videos.
- Create pages such as About and Contact.
- Change your website design using themes.
- Add features using plugins.
WordPress itself is free, open-source software.
However, if you use self-hosted WordPress, you generally need to pay for hosting and a domain name.
This guide focuses on WordPress.org (self-hosted WordPress) rather than the hosted WordPress.com service.
You can learn more at the official WordPress.org website.
How Do Bluehost and WordPress Work Together?
Bluehost provides the hosting environment, while WordPress provides the tools to build and manage your blog.
Instead of installing WordPress manually through a complicated technical process, you can use Bluehost’s WordPress installation tools.
Once WordPress is installed, you can log in to your dashboard and start customising your blog.
You can also read Bluehost’s official WordPress installation guide for additional help.
Is Bluehost Good for Complete Beginners?
Bluehost can be a practical choice for someone who wants to start a self-hosted WordPress blog without learning to code.
Some beginner-friendly features include:
- WordPress installation tools.
- A dashboard for managing websites.
- Access to WordPress themes and plugins.
- SSL certificates included with eligible hosting plans.
- Live chat support.
- Different hosting plans for different website needs.
Bluehost currently offers plans such as Starter and Business, but plan features, introductory prices, renewal rates, and promotions can change.
For example, eligible hosting terms and domain extensions may include a free domain for the first year. That doesn’t mean the domain will remain free forever.
Before purchasing, always review the latest details on Bluehost’s official WordPress hosting page.
If you’re building a simple personal blog, you may not need an expensive hosting plan to start.
The most important thing is to choose a plan that meets your needs without paying for features you won’t use.
Ready to Start Your First WordPress Blog?
If you’re ready to create your own blog, Bluehost is one option worth exploring.
Review its current WordPress hosting plans, compare the included features, and check the total cost before deciding.
Check the latest offers, renewal prices, and available features before you buy. You don’t need to choose a plan until you’re comfortable with the details.
Affiliate Disclosure: This article contains affiliate links. If you purchase through one of my links, I may earn a commission at no extra cost to you. I only recommend services that I believe may be useful to my readers, based on my experience and research.
Step 1: Choose Your Blog Topic and Name
Before you sign up for Bluehost, take a moment to think about what your blog will be about.
You don’t need a perfect business plan or years of experience. You just need a topic you enjoy and can write about regularly.
For example, you could start a blog about:
- Personal finance and saving money
- Travel and budget-friendly holidays
- Food and easy recipes
- Parenting and family life
- Blogging and online business
- Hobbies, crafts, or home improvement
If you want to make money blogging in the future, choose a topic people are actively searching for.
You can also think about products, services, or useful resources you might recommend to your readers later.
How to Choose a Good Blog Name
Your blog name should be easy to remember, spell, and share.
Here are three simple tips:
- Keep it short and clear.
- Avoid complicated spelling and unnecessary numbers.
- Choose a name that gives you room to grow.
For example, if you want to write about budget travel, a name like “Simple Travel Adventures” gives you more flexibility than a name focused on only one destination.
Don’t spend weeks trying to find the perfect name.
Start with a simple idea and build your brand over time.
Step 2: Choose the Right Bluehost Hosting Plan
Now it’s time to choose a hosting plan for your new WordPress blog.
Bluehost offers several WordPress hosting options, but you probably don’t need the most expensive plan when you’re just starting.
For a simple personal blog, a beginner-level plan may provide everything you need.
Bluehost Starter vs Business: Which Should You Choose?
Here is a quick comparison of two Bluehost WordPress hosting plans.
| Feature | Starter | Business |
|---|---|---|
| Best for | New bloggers and simple websites | Growing blogs and multiple websites |
| WordPress installation | Included | Included |
| Free SSL certificate | Included | Included |
| First-year domain offer | Eligible plans | Eligible plans |
| Storage | 10 GB | 50 GB |
| Websites supported | Up to 10 | Up to 50 |
| Live chat support | Included | Included |
| Phone support | Not included | Included |
| Additional security features | Basic protection | More advanced protection |
Plan details are based on Bluehost’s published WordPress hosting information reviewed in November 2026. Features, eligibility, prices, and promotions may change.
My Recommendation for New Bloggers
If you’re starting your first blog and want to keep costs down, I’d start with the Starter plan.
It offers the basic tools needed to build a WordPress website without paying for a more expensive package.
However, if you expect to run several websites or want additional security and support features, the Business plan may be worth comparing.
Remember that a higher-priced plan doesn’t automatically make your blog more successful.
Your content, consistency, and understanding of your readers matter much more.
Don’t Forget to Check Renewal Prices
Bluehost often advertises introductory hosting prices.
These prices can be lower than the regular renewal rates.
Before choosing a plan, check:
- The introductory price.
- The length of the hosting contract.
- The total amount due today.
- The renewal price after the introductory term.
- Whether a domain is included.
- Any optional services added to your order.
Some advertised monthly rates require you to pay for a longer hosting term upfront.
You can check the latest details on the official Bluehost WordPress hosting page.
If you’re ready to compare options, explore the current Bluehost hosting plans before deciding.
Take your time reviewing the prices and features. Choose a plan that fits your current budget and blogging goals.
Step 3: Choose Your Domain Name
Your domain name is your blog’s address on the internet.
For example, if your blog is called Simple Travel Adventures, your domain might look like:
simpletraveladventures.com
This is the address readers will type into their browsers to visit your website.
How to Register a Domain with Bluehost
After selecting your hosting plan, Bluehost may guide you through the domain registration process.
Depending on the checkout flow, you may be able to register a new domain, connect an existing domain, or choose a domain later.
If you’re registering a new domain:
- Enter the domain name you want.
- Choose an available extension, such as
.com. - Check whether the name is available.
- Review the domain registration terms.
- Continue with the setup process.
If your first choice is unavailable, try a shorter version or a different combination of words.
Is a Domain Name Free with Bluehost?
Bluehost advertises a free domain for the first year with eligible hosting plans.
However, eligibility depends on the offer, billing term, and domain extension.
Remember that you usually need to renew your domain each year.
A free domain for the first year does not mean a free domain forever.
Check the domain renewal price and any privacy-related charges before completing your purchase.
Step 4: Create Your Bluehost Account
Once you’ve selected your hosting plan and domain, you’ll need to create your Bluehost account.
Here, you’ll enter your account details and review your order.
Complete the Signup Process
Follow the instructions displayed during checkout.
You may be asked to:
- Enter your name and contact information.
- Create or confirm your account login details.
- Choose your hosting billing term.
- Review your domain selection.
- Review any optional products or services.
- Enter your payment information.
- Confirm the total price and complete your purchase.
The exact checkout screens may vary by country and the current Bluehost sign-up process.
Watch Out for Optional Extras
During checkout, you may see additional services such as domain privacy, professional email, backups, or security tools.
Some may be useful, but not every beginner needs every extra.
Before paying, check whether your hosting plan already includes a feature.
Also review whether an optional service renews automatically.
If you’re starting a blog on a small budget, avoiding unnecessary extras can help reduce your initial cost.
What Happens After You Sign Up?
After you complete payment and activate your account, you should be able to access your Bluehost account dashboard.
From there, you can manage your hosting, domains, and websites.
Keep your login information safe and enable additional account security options when available.
You’re now ready to set up WordPress.
Step 5: Install WordPress with Bluehost
This is one of the most important steps in the Bluehost WordPress tutorial.
WordPress is the software you’ll use to write blog posts, create pages, and manage your website.
The good news is that Bluehost provides a guided WordPress installation process.
You usually don’t need to download WordPress files or install everything manually.
How to Install WordPress from Your Bluehost Dashboard
According to Bluehost’s WordPress installation instructions, you can start a new installation from the Bluehost Portal.
Here is the process:
- Log in to your Bluehost account.
- Select Websites from the left-hand menu.
- Click Add Website.
- Select WordPress as your website type.
- Allow Bluehost to begin installing WordPress.
- Follow the setup instructions to configure your new website.
If you already have a WordPress website, Bluehost may offer an option to import it. For a brand-new blog, choose the option for creating a new website.
Use Bluehost’s Website Creation Tools
Bluehost’s current WordPress setup process includes an AI Site Creator.
This tool can help you build a starting design for your website.
During setup, you may be asked to:
- Enter your website title.
- Write a short description of your blog.
- Choose the type of website you’re creating.
- Add a logo if you have one.
- Select your experience level.
- Preview suggested website designs.
If you’re completely new to WordPress, you can select the beginner experience level when prompted.
Then review a design and customise it before publishing.
Don’t worry about making everything perfect immediately.
You can change your website design, images, and content later.
For the latest instructions, follow Bluehost’s official How to Install WordPress Using the Bluehost Portal guide.
What If WordPress Is Already Installed?
If Bluehost has already created your WordPress website during signup, you don’t need to install another copy.
Instead, open the existing website from your Bluehost account and continue to the WordPress dashboard.
Creating another installation unnecessarily could make managing your website more confusing.
If you’re unsure, check the Websites section before starting a new installation.
What If Something Goes Wrong?
If your installation doesn’t finish or you see an error message, don’t panic.
First, check whether Bluehost has already created the website.
If not, review the error message and contact Bluehost support if you need help.
I found Bluehost’s chat support helpful when I experienced a technical problem with my own WordPress website.
Although my situation involved malware rather than installation, it reminded me how valuable technical support can be when you’re learning.
You don’t have to solve every technical problem alone.
Step 6: Log In to Your New WordPress Dashboard
Once WordPress has been installed, it’s time to explore your new website.
You can usually open the WordPress admin area from your Bluehost website management screen.
For many WordPress installations, the login address follows this format:
Replace yourdomain.com with your own domain name.
If your domain is still being connected or your website uses a temporary address, use the login option Bluehost provides instead.
Understanding the WordPress Dashboard
When you log in, you’ll see the WordPress administration area.
Here are some of the most important sections:
| Dashboard Menu | What It Does |
|---|---|
| Posts | Create and manage blog articles |
| Pages | Create pages such as About and Contact |
| Media | Upload and manage images |
| Appearance | Manage themes and design options |
| Plugins | Add extra website features |
| Settings | Manage important WordPress settings |
The exact menu may look slightly different depending on your WordPress version, theme, and installed plugins.
For now, you only need to become familiar with the basic layout.
Do You Need Coding Skills to Use WordPress?
No.
WordPress includes a block editor that lets you create content using text, images, headings, buttons, and other blocks.
You can build a simple blog without writing code.
You can also use themes to control your website’s design.
In the next section of this guide, we’ll look at the important settings, pages, and design choices that will help you prepare your blog for visitors.
You’re One Step Closer to Launching Your Blog
By now, you should understand how to choose a hosting plan, register a domain, create a Bluehost account, and install WordPress.
If you haven’t started yet, you can review Bluehost’s current hosting offers and follow these steps when you’re ready.
Once your hosting account is ready and WordPress is installed, you can move on to customising your blog and preparing your first post.
Step 7: Configure Your Important WordPress Settings
Congratulations! If you’ve followed the previous steps, you now have a WordPress website.
But before publishing your first blog post, check a few important settings.
These settings can help make your blog easier to manage and prepare it for visitors and search engines.
Set Your Website Title and Tagline
Your website title is the name of your blog.
Your tagline is a short sentence that explains what your blog is about.
To update them:
- Log in to your WordPress dashboard.
- Go to Settings → General.
- Find the Site Title and Tagline fields.
- Enter your blog name and a short description.
- Click Save Changes.
For example:
Site Title: Simple Travel Adventures
Tagline: Easy Travel Tips for Beginners
Your tagline doesn’t need to be perfect. You can update it as your blog grows.
Check Your WordPress Permalink Settings
A permalink is the web address of a page or blog post.
For example:
yourblog.com/how-to-start-a-blog/
A short, descriptive URL is usually easier for readers to understand.
To check your settings:
- Go to Settings → Permalinks.
- Find the permalink structure options.
- For a new blog, consider selecting Post name.
- Click Save Changes.
This structure creates simple URLs based on your post titles.
Important: If your website already has published articles, changing the permalink structure could break existing links. This recommendation is mainly for brand-new blogs.
Check Your Search Engine Visibility Settings
You want Google and other search engines to be able to discover your public blog.
Go to Settings → Reading.
Look for the option labelled:
“Discourage search engines from indexing this site.”
For a public blog that is ready to be discovered, this box should normally be unchecked.
Remember that allowing indexing does not guarantee your website will appear in Google search results.
Google decides which pages to index based on several factors, including content quality and technical accessibility.
Set Your Time Zone
In Settings → General, choose the correct time zone for your location.
This helps WordPress schedule and publish posts at the right time.
Once you’ve checked these settings, you’re ready to start designing your blog.
Step 8: Choose a WordPress Theme for Your Blog
Your WordPress theme controls how your website looks.
It affects the layout, fonts, colours, menus, and overall design.
You don’t need an expensive premium theme to create a professional-looking blog.
Many beginners can start with a free WordPress theme.
How to Install a WordPress Theme
Follow these steps:
- Open your WordPress dashboard.
- Go to Appearance → Themes.
- Click Add New Theme.
- Browse the available themes.
- Click Preview to explore a design.
- Select Install.
- Click Activate when you’re ready to use it.
Some hosting setup tools may already have installed a theme for you.
If you like your current theme, you don’t need to replace it.
What Should Beginners Look for in a Theme?
Choose a theme that is:
- Easy to customise.
- Mobile-friendly.
- Fast-loading.
- Regularly updated.
- Compatible with the WordPress block editor.
- Suitable for a blog.
Here are three themes worth exploring:
| WordPress Theme | Why Beginners May Like It |
|---|---|
| Kadence | Flexible design options and a free version |
| Astra | Lightweight design with customisation options |
| GeneratePress | Simple layouts with a focus on performance |
You can find these themes in the official WordPress Theme Directory.
Keep Your Blog Design Simple
When I first started blogging, I learned that getting the basics working was more important than creating a perfect design.
You don’t need dozens of colours, animations, or complicated layouts.
Start with:
- A clear blog title or logo.
- Easy-to-read fonts.
- A simple navigation menu.
- A clean background.
- A mobile-friendly layout.
Your readers are visiting because they want helpful information.
Make it easy for them to find it.
Step 9: Create the Essential Pages for Your Blog
Before launching your blog, you should create a few important pages.
These pages help readers understand who you are, what your blog offers, and how to contact you.
1. About Page
Your About page introduces you and your blog.
Explain:
- Who you are.
- Why you started blogging.
- What topics you write about.
- How your content helps readers.
You don’t need to share private details.
Focus on building a connection with your audience.
2. Contact Page
A Contact page gives readers and potential business partners a way to reach you.
You can include a dedicated email address or a contact form.
If you use a contact form, check that messages are delivered correctly.
3. Privacy Policy
A Privacy Policy explains how your website collects, uses, and handles personal information.
This is especially important if you use analytics, cookies, contact forms, or advertising services.
WordPress includes a Privacy Policy guide under Settings → Privacy.
However, the final policy should accurately describe how your website operates and comply with the laws that apply to your audience.
4. Affiliate Disclosure
If you plan to earn commissions by recommending products or services, you should clearly disclose your affiliate relationships.
For example:
“This post contains affiliate links. If you purchase through my links, I may earn a commission at no extra cost to you.”
Place disclosures where readers can easily see them before interacting with affiliate recommendations.
A separate disclosure page can provide additional details, but it should not replace clear disclosures within relevant articles.
How to Create a New Page
- Go to Pages → Add New.
- Enter the page title.
- Add your content using the WordPress block editor.
- Preview the page.
- Click Publish when you’re ready.
Repeat these steps for your important pages.
Add Your Pages to a Navigation Menu
Once your pages are published, add them to your website navigation.
Depending on your theme, you may manage navigation through Appearance → Editor, Appearance → Menus, or your theme’s header settings.
A simple beginner menu might include:
Home | Blog | About | Contact
Keep it easy to understand.
Ready to Build Your Own Blog?
If you haven’t created your website yet, you can use Bluehost’s WordPress setup tools to get started.
You don’t need a finished logo, a perfect design, or dozens of articles to get started.
Start with the essentials. You can improve your design and add more content as your blogging skills grow.
Step 10: Write and Publish Your First Blog Post
Now comes one of the most exciting parts of blogging: writing your first article.
Your first post doesn’t need to be perfect.
The goal is to create something useful for your readers.
Choose a Helpful Topic
Think about a question your ideal reader might ask.
For example, if you’re starting a travel blog, you could write:
- How to Plan Your First Budget Holiday
- 10 Travel Essentials for Beginners
- How to Save Money on Accommodation
If you’re starting a food blog, you might write:
- 5 Easy Dinner Recipes for Busy Beginners
- How to Start Meal Planning on a Budget
- Simple Baking Tips for First-Time Bakers
Choose one clear topic and focus on helping the reader.
How to Create Your First WordPress Post
- Open your WordPress dashboard.
- Go to Posts → Add New.
- Enter a clear, descriptive title.
- Write a short introduction. Organise
- Organise your content using headings.
- Add helpful images if needed.
- Preview your article.
- Click Publish when you’re ready.
WordPress uses a block editor, so you can add headings, paragraphs, images, and buttons without coding.
Use Headings to Organise Your Content
A well-organised blog post is easier to read.
For example:
H1: How to Plan Your First Budget Holiday
H2: Choose Your Destination
H2: Set Your Travel Budget
H2: Find Affordable Accommodation
H2: Pack the Essentials
Use H3 headings when you need smaller sections under an H2.
For most simple blog posts, one main H1 title followed by H2 and H3 headings is a clear structure.
Add Images That Help Your Readers
Images can make your blog posts more useful and engaging.
Use images that relate directly to your topic.
When uploading images:
- Choose clear, relevant pictures.
- Compress large image files when appropriate.
- Use descriptive file names.
- Add useful alternative text when the image conveys information.
Alternative text should describe the image’s meaning or purpose, not simply repeat keywords.
You can use your own photographs, properly licensed stock images, or original graphics.
Step 11: Set Up Basic SEO for Your New Blog
SEO stands for Search Engine Optimisation.
It means improving your website so search engines can better understand your content.
SEO can help your blog attract visitors from Google and other search engines over time.
However, ranking in search results is not guaranteed.
Find Keywords Your Readers Search For
A keyword is a word or phrase people type into a search engine.
For example:
“how to start a blog with Bluehost”
If you’re writing about that topic, your article should answer the questions people are likely to have.
For each post, choose one main topic or primary keyword.
You can also use related phrases naturally throughout your content.
Avoid repeating the same keyword unnecessarily.
Write Helpful SEO Titles
Your article title should clearly explain what readers will learn.
For example:
How to Start a Blog with Bluehost (2026) – Step-by-Step Beginner Guide
This title tells readers what the article covers and who it is for.
A useful title is more important than trying to include as many keywords as possible.
Add Internal Links
Internal links connect related articles on your own website.
For example, if you publish an article about starting a blog, you could link to another article about blogging costs.
Internal links help readers discover more information and can help search engines understand how your content is organised.
Only add links that are relevant to the reader.
Consider Using an SEO Plugin
WordPress SEO plugins can help you manage certain search-related settings.
Popular options include:
- Yoast SEO
- Rank Math
- All in One SEO
You usually only need one main SEO plugin.
An SEO plugin can help with titles, meta descriptions, and other settings, but it cannot guarantee Google rankings.
Set Up Google Search Console
Google Search Console is a free tool that helps you monitor how your website performs in Google Search.
It can help you:
- Check whether Google has indexed your pages.
- Submit your website’s sitemap.
- Find search queries that bring visitors to your site.
- Identify certain indexing and technical issues.
You can get started at Google Search Console.
You can also read Google’s official SEO Starter Guide.
Remember that new blogs often need time to build search visibility.
Focus on publishing useful content rather than expecting immediate traffic.
Step 12: Understand the Cost of Running a Blog
Starting a blog doesn’t have to be extremely expensive.
However, understand the costs before committing long-term.
Common Blogging Expenses
| Expense | What You Should Know |
|---|---|
| Web hosting | Usually required for self-hosted WordPress |
| Domain name | Usually renewed annually |
| WordPress software | Free to use |
| WordPress theme | Free and premium options available |
| Plugins | Many free options; some paid |
| Email marketing | Free and paid plans available |
| Backups and security | Some features may be included; others may cost extra |
Bluehost’s introductory prices and renewal rates depend on the plan and billing term you choose.
You should also review the cost of optional services.
How to Keep Your Blogging Costs Low
If you’re a complete beginner, you can often start with:
- A basic hosting plan.
- One domain name.
- A free WordPress theme.
- Essential free plugins.
- Your own original content.
You don’t need to purchase every blogging tool immediately.
As your website grows, you can decide whether additional services are worth paying for.
Is Bluehost Worth the Cost for Beginners?
In my experience, Bluehost made it easier to get started with WordPress.
The initial cost was manageable for me, and I appreciated having access to support.
However, I also learned that additional services can cost money.
For example, when my website experienced a malware problem, the cleanup required an extra payment.
That’s why I recommend looking at the total cost of ownership rather than focusing only on the introductory hosting price.
If you’re comparing hosting options, review the latest features and renewal terms before choosing.
Compare the total cost, included tools, and renewal terms before purchasing. The best hosting plan meets your needs and fits your budget.
Step 13: Can You Make Money from Your New Blog?
Many people start blogging to build a side hustle or earn income online.
The good news is that a blog can become a source of income.
However, earning money from blogging usually requires time, useful content, and consistent effort.
A new blog isn’t guaranteed to become profitable.
1. Affiliate Marketing
Affiliate marketing means recommending products or services and earning a commission when someone makes a qualifying purchase through your link.
For example, a travel blogger might recommend luggage or travel accessories.
A blogging website might recommend web hosting or WordPress tools.
The most important thing is to recommend products that are genuinely relevant to your readers.
Always disclose affiliate relationships clearly.
2. Display Advertising
Some bloggers earn money by showing advertisements on their websites.
Advertising income depends on factors such as traffic, audience, and the advertising program.
A new blog may not qualify for certain advertising networks immediately.
3. Digital Products
You could eventually create and sell:
- Ebooks
- Printable planners
- Templates
- Online courses
- Digital guides
Digital products work best when they solve a real problem for your audience.
4. Services
Your blog can also help you promote services such as writing, consulting, design, or coaching.
You don’t have to use every monetisation method.
Choose an approach that matches your topic, skills, and audience.
Focus on Helping Readers First
If your goal is to make money blogging, don’t focus only on affiliate links or advertisements.
Start by publishing useful articles that answer real questions.
Build trust with your readers.
Learn which topics attract visitors.
Over time, you can experiment with monetisation methods that fit your blog.
Step 14: Prepare Your Blog for Launch
Before sharing your website with the world, make sure the basics work.
Your Beginner Blog Launch Checklist
- Your domain opens the correct website.
- Your website uses HTTPS.
- Your WordPress title and tagline are correct.
- Your blog looks good on mobile devices.
- Your navigation menu works.
- Your About and Contact pages are published.
- Your Privacy Policy reflects your website’s data practices.
- Your first helpful blog post is published.
- Your important internal links work.
- Your backup and security arrangements are in place.
- Your website is ready for search engine discovery.
You don’t need a perfect website to begin.
You need a working website, helpful content, and a willingness to keep learning.
Your Blogging Journey Starts Here
Starting a blog is only the beginning.
The next stage is learning how to create useful content, improve your website, and attract readers.
If you’re still deciding where to host your WordPress blog, you can review Bluehost’s current plans and choose the option that works for you.
Once your website is ready, focus on publishing your first helpful article. You can improve your blog step by step as you gain experience.
Conclusion: Ready to Start Your Blog with Bluehost?
Starting your first WordPress blog might seem difficult, but it becomes much easier when you follow the process step by step.
You don’t need coding skills, an expensive website design, or years of technical experience.
With Bluehost and WordPress, you can create a website, customise its appearance, and begin publishing your own content.
When I started blogging, Bluehost was my first hosting provider. I used it for about three years, and its beginner-friendly WordPress setup helped me get started.
My experience wasn’t perfect, but it taught me that choosing a hosting provider with accessible support is important.
If you’re ready to start, remember these three things:
- Choose a hosting plan that fits your budget, including its renewal costs.
- Focus on creating a simple, useful WordPress blog.
- Keep learning and consistently publishing helpful content.
Your first blog doesn’t need to be perfect. It just needs a good starting point.
Take the First Step Toward Your New Blog
If you think Bluehost is the right choice for you, take a look at its current WordPress hosting plans.
Compare features, introductory offers, and renewal prices before you decide.
Choose the plan that fits your needs, follow the setup steps in this guide, and start building your WordPress blog at your own pace.
Frequently Asked Questions About Starting a Blog with Bluehost
1. Can I start a blog with Bluehost without coding?
Yes. Bluehost provides WordPress installation tools, and WordPress includes a block editor that allows you to create pages and blog posts without writing code.
You may want to learn more technical skills later, but coding is not required to start a basic WordPress blog.
2. Is Bluehost good for beginners?
Bluehost can be a suitable option for beginners who want a self-hosted WordPress website.
I found the WordPress setup easy to follow when I first started blogging.
However, you should compare hosting plans, renewal costs, features, and support before deciding whether Bluehost is right for you.
3. How long does it take to start a blog with Bluehost?
The initial hosting sign-up and WordPress installation may take only a short time.
However, choosing your domain, customising your design, writing pages, and preparing your first article can take longer.
There is no need to rush. A well-prepared blog is more useful than an unfinished website launched too quickly.
4. Do I need to buy a domain name separately?
Not necessarily.
Bluehost offers a first-year domain promotion with eligible hosting plans, but the conditions vary.
You can also use a domain registered with another provider.
Always check the registration and renewal costs before purchasing.
5. Is WordPress free when using Bluehost?
Yes. The WordPress software is free and open source.
However, Bluehost hosting, domain registration, premium themes, plugins, and optional services may cost extra.
You can build a basic WordPress blog using free themes and plugins.
6. Can I change my WordPress theme later?
Yes. You can install and activate another WordPress theme after launching your blog.
However, changing themes may affect your website’s layout, menus, and design settings.
Back up your website before making major changes.
7. Can I make money blogging with Bluehost?
Yes, you can use a Bluehost-hosted WordPress blog for monetisation methods such as affiliate marketing, advertising, digital products, or services, subject to applicable terms.
However, Bluehost does not guarantee that your blog will earn money.
Your results depend on your content, audience, traffic, and business strategy.
8. Why isn’t my new blog appearing on Google?
A new blog may take time to be discovered and indexed by Google.
You can use Google Search Console to check your indexing status and submit a sitemap.
Make sure your website is accessible, your content is helpful, and important pages are linked from your website.
Submitting a page for indexing does not guarantee that Google will include it in search results.
For more information, read Google’s guide to how Search works.
Recommended Next Reads
Now that you know how to start a blog with Bluehost, here are some helpful guides to continue your blogging journey.
Bluehost Review: My Experience Using Bluehost
Want to learn more before choosing a hosting provider?
Read my Bluehost review to learn about my experience, the advantages, and what beginners should consider.
Read Next: Bluehost Review
Bluehost vs Hostinger: Which Is Better for Beginners?
Still comparing hosting providers?
This guide explores the differences between Bluehost and Hostinger to help you decide which may be a better fit for your WordPress blog.
Read Next: Bluehost vs Hostinger
How Much Does It Cost to Start a Blog? (2026 Beginner Guide)
Want to understand your blogging budget?
Learn about common startup expenses, optional tools, and ways to avoid unnecessary costs.
Read Next: How Much Does It Cost to Start a Blog?
Do You Really Need Coding Skills to Start a Blog? (2026 Beginner Truth)
Worried about technology?
Discover why beginners can create a WordPress blog without becoming programmers.
Read Next: Do You Really Need Coding Skills to Start a Blog?
Best Blogging Platforms for Beginners (2026)
Not sure whether WordPress is the right platform?
Compare beginner-friendly blogging platforms and learn what to consider before choosing.
Read Next: Best Blogging Platforms for Beginners (2026)